Showing posts with label Tools. Show all posts

Saturday, January 23, 2010

Back from Philly

I spent Monday p.m. through Saturday a.m. in Philadelphia (for all-day meetings for work, Tuesday through Friday). My flight out of PHL this morning was at 7 a.m., which  meant the alarm was set for 5:10.  I stayed the night at the airport Marriott, so I only had a 5 minute shuttle ride to the terminal. But here's where it got crazy. I arrived on Monday via Delta in terminal A, where Delta has been for the past few years. However, when the shuttle driver cruised by terminal A, I asked him whether he forgot that I was going to Delta. Well, it turns out that during the week Delta moved back to terminal E, where it had been before the move to A. That was fine -- except that even though Delta check-in is now in terminal E, the gates are in terminal D!!! Since I travel to Philadelphia once every 3 or 4 weeks, this is going to be a real pain! At least I was upgraded to first class both going and coming.

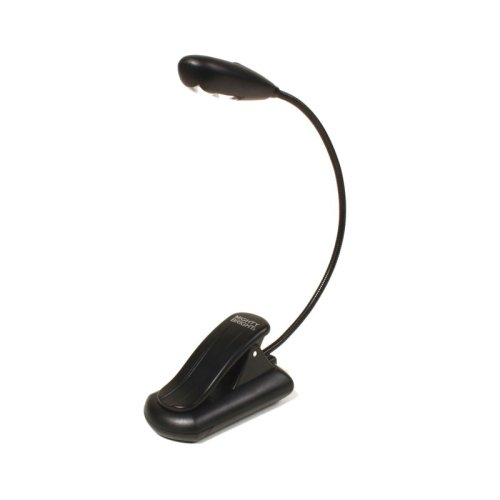
But boy did I miss my sewing machine! However, I did take counted cross stitching with me and was able to stitch on the plane, plus found time a couple evenings to work on my travel cross-stitch projects. But why do hotel rooms always have such crummy lighting? I used to travel with a 150 watt bulb and replace the bulb in one of the hotel lamps in order to see what I'm stitching. But now I travel  with a battery-operated, clip-on  LED light which works great. I bought mine from Amazon.com -- and it works with my Kindle as well. This light is light-weight enough that I can clamp it right to my hoop and it doesn't add much weight.


I thought I'd share what I use to transport my cross-stitch projects -- the plastic zippered bag that pillow cases often come in. I'm sure I'm not the first to think of this, but it works very well.


The dimensions are approximately 5.5 x 9 x 2 inches -- perfect for carrying around a couple small projects. Just look at everything I can carry in this little bundle.


From the photo you can see a couple of my tricks for when I cross stitch while traveling (and even when I'm not traveling for that matter). The first is to pre-thread a bunch of needles with the different floss colors I'll be using. That way I don't have to take time to thread needles while at 35000 feet! And while I love the many darling needle holder/organizers -- as you can see, I've just used scraps of quilt batting for holding my threaded needles.

I usually travel  with these Gingher thread snips -- and I haven't had any problem taking them through security (at least since about 2003).


I also travel with these scissors -- for when I need to undo a big area of stitching (rather than unpick). I had to replace these scissors because they WERE confiscated by security in Paris -- even though they were fine in the US, the French authorities weren't at all accommodating! I was not happy -- especially since  they are perfectly harmless.


You can see the little notch in the scissors for lifting up any threads you want to snip. Very handy for this purpose, but the scissors aren't very sharp for other uses.

I hope this post has given you some ideas for taking your projects with you when you travel.

PS: I love listening to books on my iPod while stitching. I'm nearly through My Life in France, the biography of Julia Child which tells of her experience there only a few years after WWII, what it was like learning to cook at the Cordon Bleu, and the exacting process she followed while writing her classic Mastering the Art of French Cooking book.

Friday, January 15, 2010

So, let's talk irons...

Clearly one of the most important tools a quilter needs is a good iron. When I got back into sewing quilts (about 11 years or so ago), I decided I needed a good iron. (Hardly ever needed to iron clothes -- thanks to permanent press fabrics, the de-wrinkle cycle on the dryer, and of course, Downy Wrinkle Remover.)

I used my $15 Proctor Silex basic iron for the first year or so of my renewed interest in quilting. But, since it was clear that quilting was going to stay in my life, I was sucked into the belief that I needed a new iron. I ended up purchasing a Rowenta -- thanks to QVC and a persuasive on-air sales person. It was OK, but I never thought it got very hot, didn't put out good steam, and its auto-shutoff cycle was sooo short. After a few months, I reverted to my Proctor Silex.

Then, one year, my mom gave me a new cordless Maytag iron -- you know, the one that Marianne Fons and Liz Porter were promoting on their TV shows. Definitely not a cheap investment.  And, yes, it is very nice to not have to deal with the cord -- especially if you are pressing a full quilt. But even it failed to live up to the hype. Within a year, it started to seep goo from the iron's "joints".


Perhaps you can see from my pic above where the goo has seeped out. It got to the point where the iron couldn't hold any water for steam pressing. Not a big deal, because it still got nice and hot and I could use Mary Ellen's Best Press or a scented linen spray or just spray with water. I'm guessing the iron wasn't designed to be used off and on all day. It would shut off after 4 or 5 minutes -- can't remember exactly how long. But then the temperature dial fell off, meaning I was stuck with the temperature it had been the last time I used the dial -- hot enough, but when combined with the other issues, it was once again time for a new iron.

So, I trolled some of the sewing bulletin boards to see what kinds of irons people were recommending. There were the Rowenta fans, the fans of the older, heavy, classic metal irons, and some were recommending brands I'd never heard of (and available for equally outrageous prices). In the end, I decided on a mid-range Black and Decker Digital Advantage iron (think I paid about $35 on Amazon). And so far (after about 6 weeks), I really like it. It's light-weight. It heats up quickly -- even if it has timed out. It generates good steam. And it didn't cost an arm and a leg.  My only complaint -- and this is hardly worth  mentioning, is that because it's digital, when you turn it on you have to set the temperature. Whereas with an analog iron, all I did was turn on the power strip it is plugged into and the dial setting was already set to the temp I needed.

Oh, a little safety tip here...
I have both a light and my iron plugged into the same power strip. I ALWAYS  know if I've left my iron on when I leave my sewing room because the light is still on. Light off -- iron off;  light on -- iron on.


LinkWithin

Related Posts with Thumbnails